Tuesday, February 12, 2013

Pumpkin Bread from America's Test Kitchen

Pumpkin Bread

Makes 2 loaves
The test kitchen’s preferred loaf pan measures 8 1/2 by 4 1/2 inches; if using a 9 by 5-inch loaf pan, start checking for doneness five minutes early.
Ingredients
Topping
  • 5tablespoons packed (2 1/4 ounces) light brown sugar
  • 1tablespoon all-purpose flour
  • 1tablespoon unsalted butter, softened
  • 1teaspoon ground cinnamon
  • 1/8teaspoon salt
Bread
  • 2cups (10 ounces) all-purpose flour
  • 1 1/2teaspoons baking powder
  • 1/2teaspoon baking soda
  • 1(15-ounce) can unsweetened pumpkin puree
  • 1teaspoon salt
  • 1 1/2teaspoons ground cinnamon
  • 1/4teaspoon ground nutmeg
  • 1/8teaspoon ground cloves
  • 1cup (7 ounces) granulated sugar
  • 1cup packed (7 ounces) light brown sugar
  • 1/2cup vegetable oil
  • 4ounces cream cheese, cut into 12 pieces
  • 4 large eggs
  • 1/4cup buttermilk
  • 1cup walnuts, toasted and chopped fine
Instructions
  • 1. FOR THE TOPPING: Using fingers, mix all ingredients together in bowl until well combined and topping resembles wet sand; set aside.
  • 2. FOR THE BREAD: Adjust oven rack to middle position and heat oven to 350 degrees. Grease two 8 1/2 by 4 1/2-inch loaf pans. Whisk flour, baking powder, and baking soda together in bowl.
  • 3. Combine pumpkin puree, salt, cinnamon, nutmeg, and cloves in large saucepan over medium heat. Cook mixture, stirring constantly, until reduced to 1½ cups, 6 to 8 minutes. Remove pot from heat; stir in granulated sugar, brown sugar, oil, and cream cheese until combined. Let mixture stand for 5 minutes. Whisk until no visible pieces of cream cheese remain and mixture is homogeneous.
  • 4. Whisk together eggs and buttermilk. Add egg mixture to pumpkin mixture and whisk to combine. Fold flour mixture into pumpkin mixture until combined (some small lumps of flour are OK). Fold walnuts into batter. Scrape batter into prepared pans. Sprinkle topping evenly over top of each loaf. Bake until skewer inserted in center of loaf comes out clean, 45 to 50 minutes. Let breads cool in pans on wire rack for 20 minutes. Remove breads from pans and let cool for at least 1½ hours. Serve warm or at room temperature.

Chocolate Raspberry Torte from America's Test Kitchen

Chocolate Raspberry Torte


Makes one 9-inch cake, serving 12 to 16
We recommend using either Callebaut Intense Dark L-60-40NV or Ghirardelli Bittersweet Chocolate Baking Bar, but any high-quality bittersweet or semisweet chocolate will work. If you’re refrigerating the cake for more than 1 hour in step 6, let it stand at room temperature for about 30 minutes before serving.
Ingredients
Cake and Filling
  • 8ounces bittersweet chocolate, chopped fine (see note)
  • 12tablespoons (1 1/2 sticks) unsalted butter, cut into 1/2-inch pieces
  • 2teaspoons vanilla extract
  • 1/4teaspoon instant espresso powder
  • 1 3/4cups (about 7 ounces) sliced almonds, lightly toasted
  • 1/4cup unbleached all-purpose flour (1 1/4 ounces)
  • 1/2teaspoon table salt
  • 5 large eggs
  • 3/4cup (5 1/4 ounces) sugar
  • 1/2cup fresh raspberries, plus 16 individual berries for garnishing cake
  • 1/4cup seedless raspberry jam
Chocolate Ganache Glaze
  • 5ounces bittersweet chocolate, chopped fine (see note)
  • 1/2cup plus 1 tablespoon heavy cream
Instructions
  • 1. FOR THE CAKE: Adjust oven rack to middle position and heat oven to 325 degrees. Line bottom of two 9-inch-wide by 2-inch-high round cake pans with parchment paper. Melt chocolate and butter in large heatproof bowl set over saucepan filled with 1 inch simmering water, stirring occasionally until smooth. Remove from heat and cool to room temperature, about 30 minutes. Stir in vanilla and espresso powder.
  • 2. Process 3/4 cup almonds in food processor until coarsely chopped, six to eight 1-second pulses; set aside to garnish cake. Process remaining cup almonds until very finely ground, about 45 seconds. Add flour and salt and continue to process until combined, about 15 seconds. Transfer almond-flour mixture to medium bowl. Process eggs in now-empty food processor until lightened in color and almost doubled in volume, about 3 minutes. With processor running, slowly add sugar until thoroughly combined, about 15 seconds. Using whisk, gently fold egg mixture into chocolate mixture until some streaks of egg remain. Sprinkle half almond-flour mixture over chocolate-egg mixture and gently whisk until just combined. Sprinkle in remaining almond-flour mixture and gently whisk until just combined.
  • 3. Divide batter between cake pans and smooth with rubber spatula. Bake until center is firm and toothpick inserted into center comes out with few moist crumbs attached, 14 to 16 minutes. Transfer cakes to wire rack and cool completely in pan, about 30 minutes. Run paring knife around sides of cakes to loosen. Invert cakes onto cardboard rounds cut same size as diameter of cake and remove parchment paper. Using wire rack, reinvert 1 cake so top side faces up; slide back onto cardboard round.
  • 4. TO ASSEMBLE TORTE: Place ½ cup raspberries in medium bowl and coarsely mash with fork. Stir in raspberry jam until just combined. Spread raspberry mixture onto cake layer that is top side up. Top with second cake layer, leaving it bottom side up. Transfer assembled cake, still on cardboard round, to wire rack set in rimmed baking sheet.
  • 5. FOR THE GLAZE: Melt chocolate and cream in medium heatproof bowl set over saucepan filled with 1 inch simmering water, stirring occasionally until smooth. Remove from heat and gently whisk until very smooth. Pour glaze onto center of assembled cake. Use offset spatula to spread glaze evenly over top of cake, letting it flow down sides. Spread glaze along sides of cake to coat evenly.
  • 6. Using fine-mesh strainer, sift reserved almonds to remove any fine bits. Holding bottom of cake on cardboard round with 1 hand, gently press sifted almonds onto cake sides with other hand. Arrange raspberries around circumference. Refrigerate cake, still on rack, until glaze is set, at least 1 hour and up to 24 hours. Transfer cake to serving platter, slice, and serve.


Carrot Layer Cake from America's Test Kitchen

Carrot Layer Cake
Serves 10-12

Shred the carrots on the large holes of a box grater or in a food processor fitted with the shredding disk. Do not substitute liquid buttermilk for the buttermilk powder. To ensure the proper spreading consistency for the frosting, use cold cream cheese. If your baked cake is of an uneven thickness, adjust the orientation of the layers as they are stacked to produce a level cake. Assembling this cake on a cardboard cake round trimmed to a 6 by 8-inch rectangle makes it easy to press the pecans onto the sides of the frosted cake.
Ingredients
Cake
  • 1 3/4cups (8 3/4 ounces) all-purpose flour
  • 2teaspoons baking powder
  • 1teaspoon baking soda
  • 1 1/2teaspoons ground cinnamon
  • 3/4teaspoon ground nutmeg
  • 1/2teaspoon salt
  • 1/4teaspoon ground cloves
  • 1 1/4cups (8 3/4 ounces) light brown sugar
  • 3/4cup vegetable oil
  • 3large eggs
  • 1teaspoon vanilla extract
  • 2 2/3cups shredded carrots (4 carrots)
  • 2/3cups dried currants
Frosting
  • 16tablespoons unsalted butter, softened
  • 3cups (12 ounces) confectioners' sugar
  • 1/3cup buttermilk powder
  • 2teaspoons vanilla extract
  • 1/4teaspoon salt
  • 12ounces cream cheese, chilled and cut into 12 equal pieces
  • 2cups (8 ounces) pecans, toasted and chopped coarse
Instructions
  • 1. FOR THE CAKE: Adjust oven rack to middle position and heat oven to 350 degrees. Grease 18 by 13-inch rimmed baking sheet, line with parchment paper, and grease parchment. Whisk flour, baking powder, baking soda, cinnamon, nutmeg, salt, and cloves together in large bowl.
  • 2. Whisk sugar, oil, eggs, and vanilla together until mixture is smooth. Stir in carrots and currants. Add flour mixture and fold with rubber spatula until mixture is just combined.
  • 3. Transfer batter to prepared baking sheet and smooth surface with offset spatula. Bake until center of cake is firm to touch, 15 to 18 minutes. Cool in pan on wire rack for 5 minutes. Invert cake onto wire rack (do not remove parchment) and then reinvert onto second wire rack. Cool cake completely, about 30 minutes.
  • 4. FOR THE FROSTING: Using stand mixer fitted with paddle, beat butter, sugar, buttermilk powder, vanilla, and salt on low speed until smooth, about 2 minutes, scraping down bowl as needed. Increase speed to medium-low; add cream cheese, 1 piece at a time; and mix until smooth, about 2 minutes.
  • 5. Transfer cooled cake to cutting board, parchment side down. Using sharp chef’s knife, cut cake and parchment in half crosswise and then lengthwise to make 4 equal rectangles, about 6 by 8 inches each.
  • 6. Place 6 by 8-inch cardboard rectangle on cake turntable or plate. Place 1 cake rectangle, parchment side up, on cardboard and carefully remove parchment. Using offset spatula, spread 2/3 cup frosting evenly over cake layer. Repeat with two more layers of cake, frosting each layer with 2/3 cup frosting and pressing gently on each layer to level. Place last rectangle of cake on top and frost top of cake with 1 cup frosting. Use remaining frosting to coat sides of cake. (It’s fine if some crumbs show through frosting on sides, but if you go back to smooth top of cake, be sure that spatula is free of crumbs.)
  • 7. Hold cake with 1 hand and gently press chopped pecans onto sides with other hand. Chill for at least 1 hour before serving.
  • To Make Ahead: The cake may be refrigerated for up to 24 hours before serving.

Thursday, March 17, 2011

Cheesecake and Kneader's Baked French Toast

So, remember THIS post? Well, not sure how I estimated that it would be a 3-year's supply but after making them last month for my brother's homecoming I'm all out and will be reordering more. I did give a couple of packages away but I used the rest of them. And this time I'm thinking of ordering 2 cases since shipping is about the same price.


This morning Kaleb and Ashton were excited to see a leprechaun had left them a bag of goodies by their doors and the footprints and gold coins he left behind. Ashton's convinced it's Halloween because he has a bag of candy. Last Saturday we had breakfast at Kneader's Bakery and Matt had the french toast which was really good. So I found THIS recipe online from Kneader's and thought I would try it.

(Picture from HERE)

Kneaders Over-Night French Toast
By: Kneader's Bakery

Ingredients:

1 loaf Kneaders Chunky Cinnamon Bread cut in 8 slices
8 eggs
3 c. milk
1 T. brown sugar
3/4 tsp. salt
1 T. vanilla
2 T. butter

Preparation:

Butter a glass baking dish generously (9" x 13"). Place the bread flat in the baking dish. Mix all remaining ingredients, reserving the butter and pour over the bread. Cut butter into pieces and dot over the top. Refrigerate over night or at least 1 hour. Bake 45 - 50 minutes at 350 degrees. Serves 8

Kneader's Carmel Syrup
1 c. Brown sugar
1 c. Creme (heavy whipping cream)
1 c. Light Karo Syrup
Blend together and heat on stovetop until sugar is smooth.
Serve warm.

I didn't buy their bread but I bought a loaf of french bread and cut it into 8 really thick slices, using the whole loaf. I didn't have time last night but next time I really want to try to make THIS bread to use. Since I didn't have cinnamon bread I sprinkled cinnamon and a little brown sugar on top after pouring the egg/milk mixture on the bread. Also, I forgot to get heavy whipping cream to use in the syrup so I substituted 3/4 c. milk and 2 T. butter and it looked and tasted almost exactly the same. I'm sure the cream would make it a little thicker than mine was.

After making this recipe I realized that this is one version of Kneader's french toast but this isn't how they make it at the bakery. The Chunky Cinnamon French Toast made at the bakery has your normal consistency along with a little crispy caramelization on the outside from cooking it on a grill/pan. To be honest I didn't like the consistency at all. It was like bread pudding and soggy bread is not my thing. Amazing flavors, especially the syrup but I couldn't get past the soggy bread and Matt didn't care for that part either. So next time I will half the egg/milk mixture and make it on the griddle or in a pan so that it resembles their french toast and I won't be attempting anymore over-night french toast recipes.

Thursday, January 13, 2011

Roasted Cauliflower with Parmesan

So easy but so yummy!

We like to roast broccoli in the oven with a little salt or garlic salt but I had never tried cauliflower. My grandma has a recipe for a cauliflower side dish that has a white sauce, cheese and bread crumbs on top that I love but it's time consuming to make. I can't tell you how much we LOVED this roasted cauliflower. Even the few pieces that didn't have parmesan cheese on them were amazing. It makes the cauliflower have a sweet roasted flavor. Matt and I couldn't stop snacking on what was left after dinner. We also tried THIS pasta with chicken instead of shrimp and mushrooms and it was good but to be honest I loved the cauliflower more.


Roasted Cauliflower

(serves 4 as side dish)

1 head of cauliflower
2 T olive oil
salt
grated parmesan


Preheat oven 375.

Cut cauliflower into little evenly-sized florets. Place on baking sheet and toss with olive oil and some salt. Roast for 15-20 minutes until tops are a little golden brown and florets are soft. Remove from oven and sprinkle with grated parmesan.

Thursday, January 6, 2011

Pasta & Yummy Bean Dip

I feel like it's stupid to post recipes when most of the things I make are from other blogs that I could just link to. But I do like having all of the recipes I like in one place because it helps me plan out my meals. I didn't take any of my own pictures (they wouldn't look as pretty anyways) but at least I'm posting something to this neglected blog!

Pasta with Tomato Cream Sauce
From: Pioneer Woman

(Picture from Pioneer Woman)
Ingredients:
* 2 Tablespoons Olive Oil
* 2 Tablespoons Butter
* 1 whole Medium Onion, Finely Diced (I used dried)
* 4 cloves Garlic, Minced
* 2 cans (15 Ounce Each) Tomato Sauce Or Marinara Sauce
* Salt And Pepper, to taste
* Dash Of Sugar (more To Taste) (I had to use a little more than a dash since my tomato sauce was really acidic)
* 1 cup Heavy Cream
* Grated Parmesan Or Romano Cheese, To Taste
* Fresh Basil, Chopped (I used dried)
* 1-½ pound Fettuccine (I used Penne)


Cook pasta according to package directions. Drain, reserving 1 cup of pasta water.

Heat butter and oil over medium heat. Add onions and garlic and saute for a minute or so. Pour in tomato sauce and add salt, pepper, and sugar to taste. Stir and cook over low heat for 25 to 30 minutes, stirring occasionally.

Remove from heat and stir in cream. Add cheese to taste, then check seasonings. Stir in pasta and chopped basil and serve immediately. (Thin with pasta water before adding basil if needed.)

I really enjoyed the flavor of this sauce and the best part is I have alot of tomato sauce from case lot sales since you can get it for a really good price so I'll be making this again. I also am going to try the PW Penne alla Betsy next week but it's really close to the same recipe as this but with the addition of shrimp and chicken broth.

Hot (and Healthy) White Bean Dip
From: Our Best Bites(Picture from Our Best Bites)

2 slices bacon (if you're like me you'll want to do extra)
4 garlic cloves, minced
1/3 cup low-sodium chicken broth
1 can cannellini beans, drained (Great Northern beans work too)
1/4 cup chopped green onions
1 tablespoon fresh lemon juice
1/2 teaspoon hot sauce
1/8 teaspoon salt
1/8 teaspoon paprika
1/8 teaspoon crushed rosemary

Cook bacon in a small saucepan over medium heat until crisp. Remove bacon from pan with a slotted spoon; set aside. Add garlic to drippings in pan; cook 1 minute, stirring frequently. Add broth and beans; bring to a boil. Reduce heat, and simmer, uncovered, 10 minutes.

Combine bean mixture, onions, and remaining ingredients in a food processor, and process until smooth. Spoon mixture into a bowl; stir in 1 tablespoon reserved bacon (or add to food processor and pulse a few times). At this point taste it and add more salt to taste, as well as hot sauce and lemon juice if desired. (I usually go heavy on both of those) Sprinkle dip with remaining bacon just before serving.

Serve with pita chips.

Storage: This works great to make ahead of time. Just store in the fridge and warm it up in the microwave before serving.

I loved this dip! I'm not usually a big fan of dips because they usually have stuff I don't like in them and they're not good for you but this was awesome. I have some precooked bacon from Costco so I used 4 slices cut up and I had to add about 1 T. butter since I didn't have any bacon grease. The butter also helped because I used a pinch of dried onions (since I didn't have green onions). I also didn't add hot sauce (don't have it) but I bet it would taste good with a little kick to it. I just put everything in the pan together to cook it, bacon and all. When I put everything in the food processor it was a little thick and wasn't mixing well so I added a little more chicken broth to it until it was the right consistency. I couldn't find Pita Chips so I ended up buying some whole wheat baked crackers and it was the perfect snack. Matt loved it too.

Tuesday, June 29, 2010

Mario Kart Cake

I know this is a long post but I needed to have the recipes and amounts I use written down so that I don't forget the next time I do a cake.

This is a cake I made for Kaleb's 6th birthday and although it was very rushed and I didn't have very much time it still turned out pretty good.


Photobucket

Photobucket

Photobucket

Photobucket

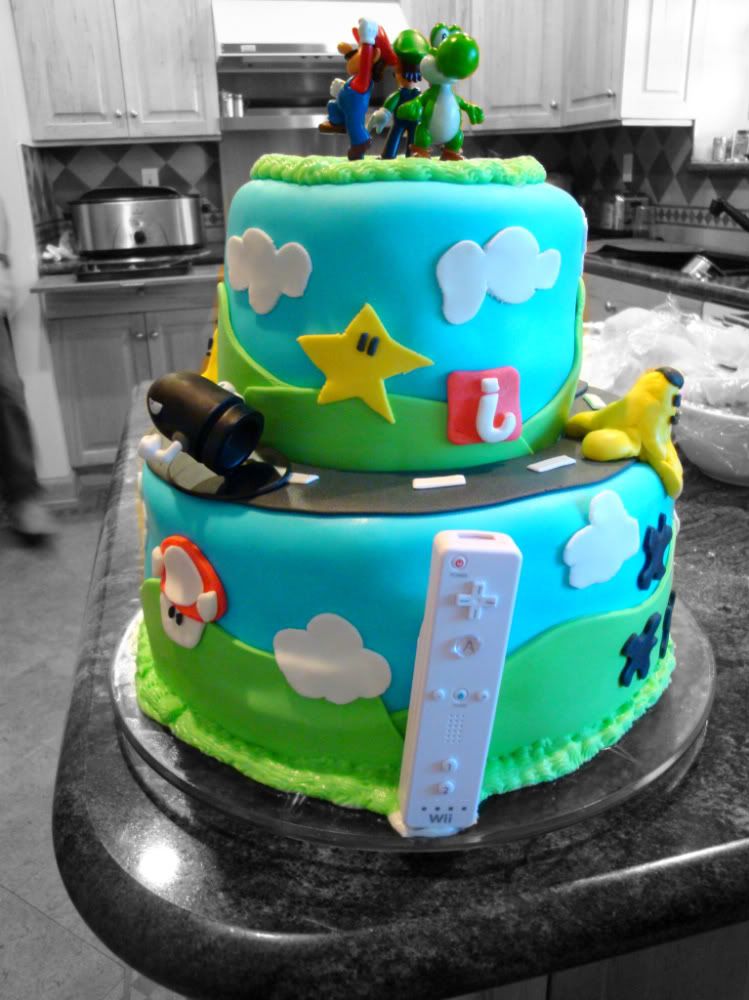
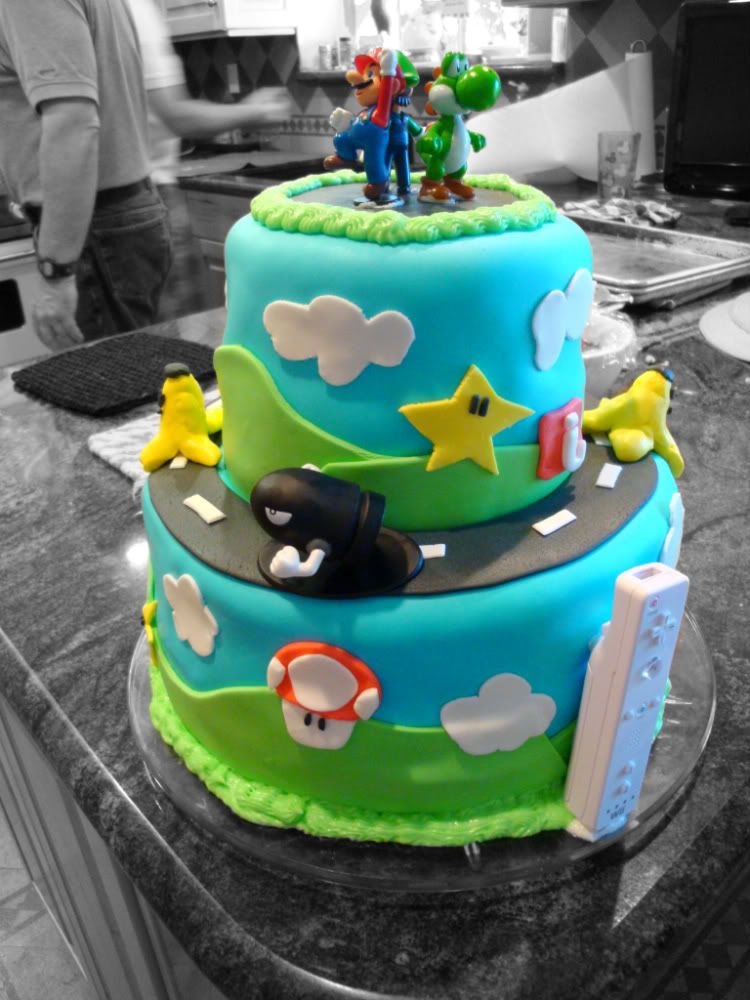
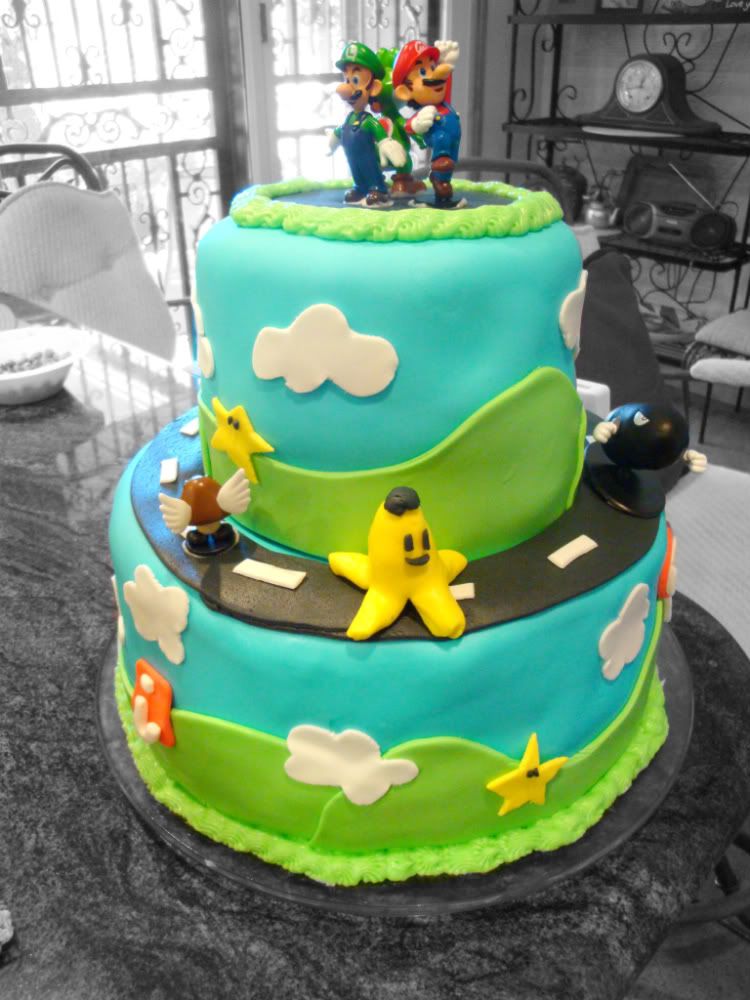
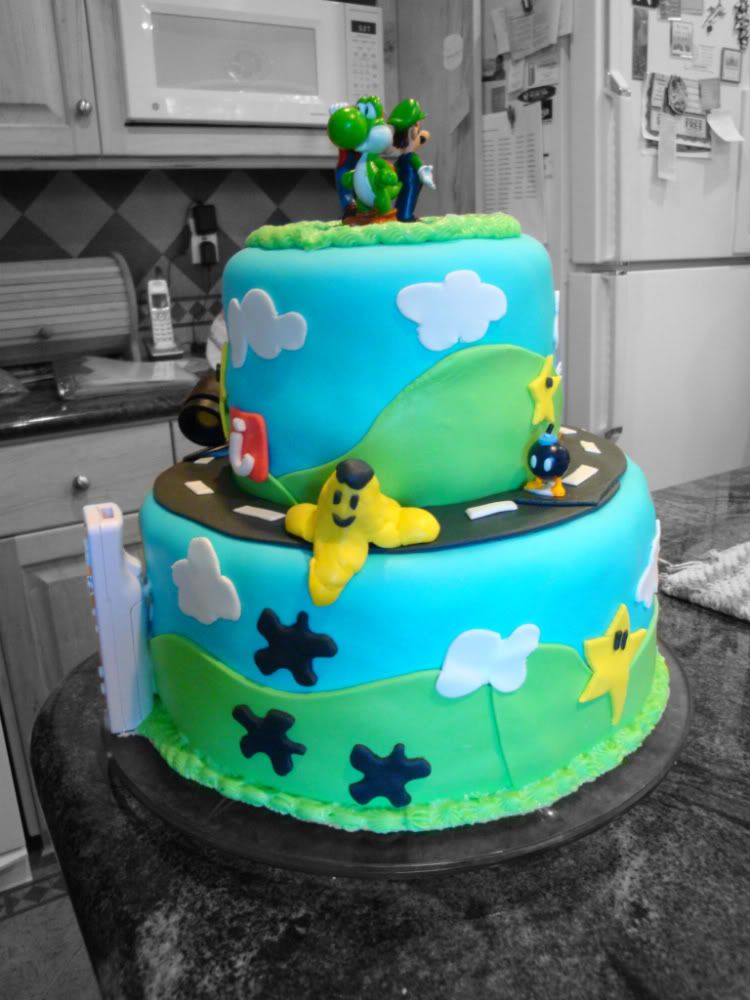
This cake consisted of 4 layers of cake with a raspberry filling and cream cheese buttercream frosting. Then I covered the cake with fondant and decorated it. It’s been so long since I’ve done a big cake that I forgot how much cake batter and fondant I would need so after this cake I told myself I would write everything down.

(There's also a blog I look at that's doing a make-a-cake series and they have pictures and instructions on fondant and cakes.)

The Cake:

I used a 10-inch and a 6-inch cake pan. My cake pans are 3 inches deep. I decided I would try the cake mix route to not only save money but a lot of time.

I mixed up 2 cake mixes and it filled both of my pans halfway which is the most you want to put in a pan. I put them in the oven together at 300 degrees convection (325 if not using convection) for 60 minutes pulling the 6-inch cake pan out of the oven after 45 minutes. Be sure to grease your pans and for the 10-inch pan I put parchment paper in the bottom to make sure it doesn’t stick and tear the cake. I then mixed up 2 more cake mixed and made 2 more layers for the cake.

After they’ve cooled completely wrap in plastic wrap. Depending how early you make the cakes you can freeze them. This helps you get a moist cake although I don’t think with a boxed cake mix this is an issue because they’re so moist already. I made my cakes the night before so I didn’t freeze them this time.

Raspberry Filling:

I tried making my own filling with my own recipe (using a couple other recipes as guidelines) and it turned out awesome. It made more than I needed so I took the extra with us so people could add more to their cake if they wanted.

2 bags of frozen raspberries
2 t. lemon juice
1 c. sugar
1/2 c. corn starch
2 c. water

In large saucepan, combine raspberries, lemon juice, sugar, cornstarch and water; mix well. Heat and stir until mixture boils and thickens. Strain the sauce to get rid of the seeds. Cool completely. Makes about 4 cups of filling. (This would taste great piped into the center of cupcakes as a filling or for a donut filling.)

Cream Cheese Butter Cream Frosting

I love this frosting. It’s the best of both worlds combining cream cheese frosting with butter cream frosting. The only downside is that you need to keep it refrigerated and so I haven’t used it on wedding cakes since you usually aren’t the one taking the leftovers home. But other than that I won’t ever use any other frosting than this one.

4 lbs. powdered sugar (2 bags)
2/3 c. water
8 oz. cream cheese (1 block)
¾ c. butter (1 ½ sticks)
1 c. vegetable shortening

Add all of the ingredients except powdered sugar to your mixer. Mix until combined. Add powdered sugar a couple of cups at a time and mix well until it’s smooth and creamy. Makes 12 cups. (This was the perfect amount for this cake, after the small amount of piping on the cake I had about 1 ½ c. left. I’m also very generous when I frost my cakes and put a lot of frosting on them especially when you have a cake this thick.)

Assemble the Cake:

Level out the top of each layer of cake so that your cake sits flat. Place a spoonful of frosting on your cake plate and place the bottom layer down. I then pipe a ring thick ring of frosting around the edge of the cake layer to create a dam so the filling doesn’t run down the cake. It also helps so that when you frost the cake you don’t mix filling in the frosting and the crack is already filled with frosting. Spread a thick layer of filling on the cake. Then take the next layer and place it cut side down on top of your first layer. You don’t want to have to try to frost the cut part or it would be a crumby mess. Then frost the whole cake.

Repeat with the second layer of cake. I invert my cake pan (6-inch) and assemble the small cake on top of it. This makes it easier when it comes time for fondant. Place both cake layers in the fridge after they’re frosted.


Rolled Marshmallow Fondant

Buying fondant is expensive and it doesn’t taste gross. You can make a standard homemade fondant (like what you would buy in the store) but the ingredients aren’t pantry staples so there are some added cost or you can make the marshmallow fondant which is softer and easier to work with. Plus, it’s not expensive to make and only takes a couple of ingredients.

1 package (16 oz) white mini marshmallows (use a good quality brand) (The bags at the store are only 10 oz. so I used 1 ½ bags per batch)
2-5 T. water
2 lbs. (8 c. or 1 bag) powdered sugar
½ c. vegetable shortening

To make marshmallow fondant, place marshmallows and 2 tablespoons of water in a microwave-safe bowl. Microwave 30 seconds on high; stir until mixed well. Continue microwaving 30 seconds more; stir again. Continue until melted (about 2 minutes).

Place 3/4 of the confectioners' sugar on top of the melted marshmallow mixture. Fold sugar into marshmallow mixture. Flavoring can be added at this point if desired. Place solid vegetable shortening in easily accessed bowl so you can reach into it with fingers as you are working. Grease hands and counter GENEROUSLY; turn marshmallow mixture onto counter. Start kneading like you would dough. Continue kneading, adding additional confectioners' sugar and re-greasing hands and counter so the fondant doesn't stick. If the marshmallow fondant is tearing easily, it is too dry; add water (about 1/2 tablespoon at a time) kneading until fondant forms a firm, smooth elastic ball that will stretch without tearing, about 8 minutes.

It's best to allow Marshmallow Fondant to sit, double-wrapped, overnight. Prepare the fondant for storing by coating with a thin layer of solid vegetable shortening, wrap in plastic wrap and then place in resealable bag. Squeeze out as much air as possible. Marshmallow Fondant will keep well in refrigerator for several weeks.

When not working with fondant, make sure to keep it covered with plastic wrap or in a bag to prevent it from drying out. When ready to use, knead fondant until smooth. Roll out fondant 1/8 in. thick.

To color fondant: If you need to tint the entire batch of fondant, add a little icing color to the melted marshmallow mixture before adding confectioners' sugar. For smaller amounts of tinted fondant, add icing color to portions of fondant as needed.

Makes about 2 lbs. of fondant
.
I made 2 batches of fondant for this cake. The first batch I tinted the melted marshmallow mixture sky blue and this fondant covered both of my cakes. The second batch I left white and then divided it into different pieces to color separately after the fondant was made. Use the gel food coloring because the liquid will mess up the fondant. If you don’t want brightly colored hands wear gloved when first mixing the coloring in the fondant. Once it’s mixed you don’t need gloves.

Covering the Cakes with Fondant:

Grease your surface and rolling pin and roll the fondant out to the size you need. Measure the sides of the cake and top to see how big of a circle you need. For a big piece of fondant it’s easier if you have 2 people and you drape it over your hands and place it centered on the cake. This time I was alone and so I couldn’t pick it up without it tearing so I folded the fondant in half and then fourths (like you would a pie crust when you’re putting it in the pan) and placed it on the cake and unfolded it. The only thing about doing this was I had a small crease in the fondant where it was folded in half but it wasn’t very noticeable. You also want your cake elevated when applying the fondant so the extra drapes over the sides. This makes it easier to smooth out. You can use your hands or a fondant smoother. I watched a couple of videos on the internet to learn how to cover a cake with fondant. Also, to get fondant pieces to stick to fondant just dip your finger in water and rub it where you want the shape. The press it to the fondant and it will stick.

Cake Tools:

I have a fondant smoother and I just bought a fondant roll and cut mat. I use my wood rolling pin but they do have fondant rolling pins you can buy. They probably are easier to use but I don’t want to spend $20 if I don’t have to. You can buy the supplies at Wal-Mart, Roberts and Michael’s. Wal-Mart is the cheapest unless you use coupons. Just look in the craft section at their decorating stuff. I buy my disposable piping bags and food coloring there too. For more specific colors or supplies Gygi’s is the best store.

Next time I will plan better and buy cookie cutters in the basic shapes I need (stars, clouds) because it’s too time consuming and doesn’t look as sharp to cut out the shapes with a knife. And they only cost about 50 cents to buy. I also want to try to mix my filling with a cream cheese mixture to make a cream cheese fruit filling. I love the strawberry cream cheese filling in Costco cakes. And the biggest issue is that I need to plan more time! With the next cake I’ll be sure to have the cake cooked, assembled, frosted and the fondant made and colored the day before. Then you just have to cover cakes and decorate which is the most time consuming.